 |
| Hiccups quilt cover that inspired my quilt |
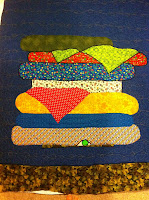
It has been 18 months since I felt inspired to start quilting again but last week it finally happened! I was in a bedding store looking for a car bed for my toddler (who, I think, is ready to graduate from his cot), when I spotted a beautiful Princess and the Pea doona cover by Hiccups. I am always falling in love with everything that they do, but I never seem to have a spare ninety odd bucks handy, lol, so I am forever dragging myself away. Or my husband is! Must have been feeling pretty capable that day because I thought I could probably have a go at making my own version for my little girl. It seemed like a particularly appropriate theme for Molly, because she never sleeps well either!
So, for my first blog ever I thought I'd show the development of Molly's Princess and the Pea quilt, and attempt a bit of a tutorial on this method of quilting while I'm at it! I hope people find it interesting and maybe even helpful.
Even though I love pale colour schemes when I see other people using them, I don't seem to be capable of it myself so I ended up going with some more bold material that I already had. My quilt is thus turning out completely different to the Hiccups one, but I like it, and Molly loves it.
I didn't want to spend a lot of money so I decided to quilt my design directly onto a single bed doona that I had previously brought for Molly and then accidentally shrunk in the wash! I started by free motion quilting the background fabric straight onto the doona so it would flatten the whole thing and make the rest of the stitching easier. The free motion quilting also makes a cheap, plain fabric more interesting and gave the quilt an instant puckered look which I love. It will also hold the stuffing in place and prevent the doona from shrinking any more!
The technique I used for this quilt is one that I have never tried before but it was so quick and easy I will definitely be doing it again! It involved four easy steps:
1.
Cut out each piece of my design (as it came to me!).
 |
| Running out of room so this Princess' bed can't get any higher | ! |
Laying out a design this way enables you to freely experiment with your design until you're happy with it. I did end up stitching as I went and didn't have the whole thing planned from the outset of the project, but if you like to plan ahead you can.
2.
Pin the pieces down securely on the quilt top.
 |
| Very rough stitches to hold the fabric in place |
3.
Roughly stitch the pieces down close to their edges (2 to 3 mm from the edge of the fabric) using a straight stitch on the sewing machine.
I used free motion quilting for the more tricky curved edges, such as on the feet and the crown, so I didn't have to worry about constantly trying to turn and manipulate the quilt under the machine.
4.
Tidy up all the edges with a black satin stitch on the sewing machine.
This served a practical purpose in that it ensured the design will survive a tumble in the washing machine. It also has aesthetic value because it defined the design and made it stand out more clearly.
I agonised over how to perch the princess on the mattress stack. I originally planned on it being a side on view of the bed but felt that the single size quilt probably wasn't wide enough to do that as effectively as I'd like. Plus, I thought it had probably been done a hundred times before by others, and I'd like to do something a bit different. After doing a few sketches I wound up settling on a quirkier design with the princess' feet poking out the bottom of the top doona. This instantly appealed to Molly because she is fascinated by toes!
 |
| The finished design. Now onto the border! |


